Translate

Thursday, 30 January 2014

Building a wood fired bread and pizza oven - Pizza Time

Exciting day today in the storey of building our wood fired bread and pizza oven.  The first hurdle was to make a safe exit for the exhaust gases from the bakery.  This required a double walled insulated stove pipe with a flashing to stop the rain and snow coming in.  None of this was available so we fabricated our own.  

Using two different diameters of stove pipe made from 2 mm mild steel, 160mm and 200mm diameters, the inner pipe is wrapped in high temperature, foil faced mineral wool.  We bound the mineral tight to the inner pipe by wrapping it in thin mettle wire and with a bit of teasing the 200 mm pipe squeezed over.  The outer pipe has the flashing welded to it at the correct angle for the ridge of the bakery roof.  The flashing we cut out of 2 mm steel sheet.  The whole thing was then cleaned up with a wire brush attachment on the angle grinder and painted, first with rust resistant primer and then a black finish coat.


Today we also took delivery of the Perlite that we will be using as a loose fill insulation around the oven.  As the delivery charge was initially more than the cost of the perlite, I decided to get a whole pallet, about 1500 L, about a hundred pounds.  More than we need, but maybe I will start growing plants in this stuff in the spring.

A little perlite insulation

With the flashing painted we could then complete the remainder of the work on the chimney.  The path the chimney takes was done so that the minimum distance between any hot surface and and flammable material is 450 mm.

Finished chimney

With the chimney completed and my parents arriving today ready for our daughters 1st birthday party on Sunday, I could not resist the temptation of have a practice run.  As mentioned in a earlier blog post, a couple of weeks ago, I promised that that oven would be ready in time to cook pizza for the party guests. At times I thought we would not get everything ready, but by getting help from Damian, we are just about ready. Last minute fabrication of a peel, handle of rough cut wood, smoothed to remove and splinters with an orbital sander.

making a peel

2 mm steel paddle cut out with an angle grinder.  Stainless would have been better, but I don't have any laying around.  Cleaned up with the wire attachment and then treated with vegetable oil and heat.

cutting out the blade of the peel

This is my first time making pizza, but I know the basics.  Really hot oven with the embers still sitting around the edge of the oven.  I made a simple dough similar to my focaccia recipe here, but not as wet and as I had not time to mess around, instant yeast was used instead of sourdough.  

After firing the oven for a couple of hours the embers were pushed to the sides and the hearth, mopped with a wet cloth wrapped around a garden rake.  The temperature of the hearth at this point was around 500 °C.

Mopping the hearth to remove some soot

measuring temperature of the hearth

A tomato sauce I have used is half good quality tinned tomato half passata.  Lots of garlic black pepper and a glug of balsamic vinegar, simmered for a while to intensify the sauce.  The first pizza was topped with home made air cured pork belly, onion and spinach.
Spinach and air cured pork belly

The second pizza was topped with home made chorizo, onion and black pepper.

Home made air cured chorizo

Had lots of fun finally using the oven that has taken so much planning and time to build.  Next step is to bake bread on Saturday followed by a very large number of pizzas on Sunday.


Tuesday, 28 January 2014

Building a wood fired bread and pizza oven - Chimney transition and more fire

Last few days have mainly been concerned with making the chimney transition, this part will act to smoothly transfer the exhaust gases to the round chimney pipe and will also contain a flap that can be moved to adjust the flow rate.  Fully closed the chimney damper will enable to oven to be sealed during baking of bread.

The transition section has been made from 2mm sheet steel, cut using an angle grinder and then welded using a cheap stick welder. The shapes were worked out by first drawing it in Sketchup and then transferring the measurements to the sheet steel.

Chimney transition in place
With the chimney transition in place, the curing fires are a lot easier to light, keep it burning and a cleaner burn with less smoke.

The oven dome has also been covered with some temporary insulation, the insulation is a foil faced mineral wool that is rated to 530°C.  I have covered the dome in this as it enables a more even heating of the dome during the curing process.

The curing fires have gradually been increased in temperature, the oven has now been fired for a total of about 24 hours.  Unintentionally, the curing has now been completed, after (I thought anyway!) fire had gone out last night, I completely filled the oven with alder logs.  I had planned to leave the logs in the oven as they had been in the rain, leaving them not dry enough to fire the oven.  Unfortunately there must have been some embers left in the oven and once the logs had dried out they ignited.  When I woke up this morning there was a large hole in the roof of the bakery (fortunately, it did not set fir to the structure) and there was a very small amount of ash where the logs had been.  The fire must have been seriously hot, all the black soot that had collected inside the oven was burned off, even on the reducer dome and chimney transition.  Several hours later the temperature of the brickwork is still over 300°C and the temperature of the hearth insulation transition is at 230°C.  I had intended to spend a few more days gradually increasing the temperature, but I guess the curing process was expedited.  There has been some cracking near the centre of the oven, but nothing more than I had expected even with a proper curing process, some in the brick dome and one crack in the refractory slab that the hearth sits on.


Friday, 24 January 2014

Building a wood fired bread and pizza oven - First curing fire

In the last couple of days we have made significant progress on my our wood fired bread and pizza oven. The final bit of cast refractory needed to be finished as early as possible as it needs at least 24 hours to dry out at 20 – 30°C before it can be cured at higher temperatures. This last bit of cast refractory covers the reducer arch and brings it up to the height of the door lintel. On the centre of these two components will sit the chimney.


pointing the inside of the oven

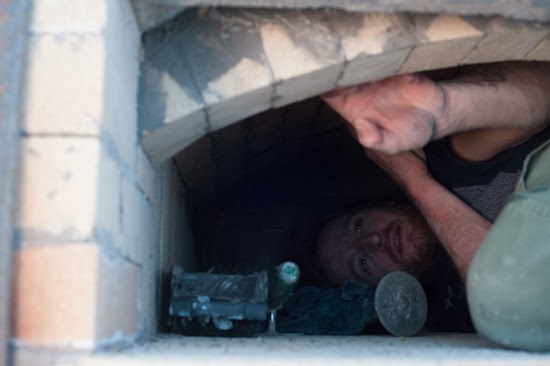
After all the vibrating of the cast, refractory is completed. We are confident that the reducer arch temporary supports can be removed. This then allowed just enough space for me to squeeze in and do a little pointing and cleaning up any unwanted mortar.


The main bits of brickwork have been heated for a few days now with an electric heater. The temperature has been gradually increased until for the last 24 hours the brickwork was held at around 40°C. The small amount of mortar used for pointing quickly dried out and so this evening I decided it was time for the first curing fire. The first curing fire was started, very small initially and then increased in size until a reasonable amount of embers built up.


For the first hour the inner surface temperature was kept to less then 120°C, this was at the point directly above the fire, then in the following 3 hours the temperature was gradually increased until most of the inside of the top part of the dome was at around 160°C. The highest surface temperatures reached were directly above the flames and were no higher than 220°C. At the front of the oven, around the chimney transition, where the refractory was only cast 24 hours earlier, the temperature did not exceed 90°C. This is in line with the curing protocol provided by PCO the manufacturer. The final temperature reached on the outside of the dome brickwork was 80°C. This was my target temperature for the day as it is the maximum surface temperature for the extruded polystyrene that is currently cladding the outside of the oven.

Monitoring internal surface temperatures using an infra-red thermometer 


Buried in the hearth of the oven at the hearth / insulation transition is a thermocouple. The temperature reached at this point, after 4 hours of gently firing was 46°C. I expect this continued to rise for some time after I wrapped up the oven and stopped monitoring in order to come inside and write up this post. It is -10°C outside at the moment, so I am glad to be finished for the night and inside drinking a hot coco.


Thursday, 23 January 2014

Rough Puff - perfect pastry for sausage meat snacks

Rough puff pastry sausage rolls


So, in less than a couple of weeks our daughter Dorothy is one year old and we are expecting about 20 relatives over for an afternoon party.  I thought I would get ahead and do some baking of some snacks that can be frozen had re-heated on the day.  One of my favourites is the sausage roll, not the kind you buy frozen, but home made they can be really delicious.  In this post I show you how I make a really simple but lovely rough puff pastry which is perfect for both savoury and sweet pastry dishes.

Rough Puff Pastry

This process is really easy to get right, just use a good quality butter and don't overwork and it will turn out great.  I am producing a big batch, so here are the quantities  I used;

750 g of plain flour
500g of butter, cold from the fridge
two pinches of salt
400 ml of water


 Cut the cold butter into cubes and put in a heavy, cold mixing bowl with the flour.  It is best not to do this in a very warm room, but if you have to, don't hang around, work quickly.


Break up the butter into ever smaller pieces.  I am using a special pastry tool, but I have also done it by holding two dinner knives.  Every time you cut the butter the cut edge gets covered in flour and so stays separated from the other bits of butter.


Stop cutting the butter when most of the butter is like breadcrumbs, but a proportion is left in pea size lumps. When we roll out the pastry, these lumps will be dispersed throughout and flattened into little leaves separating the pastry in to local layers.  This is where the puff and flakiness will come from.


About almost all of the water (cold) is added to a well in the centre of the mix.  Gently work the flour from outside with a spoon or knife, incorporating the water with as little work as possible.  The mix should be wet enough so that it binds together, without it being more than a little bit sticky.


With hands, gently press the pastry into a ball, don't start kneading like bread, we do not want to develop the gluten.

Put the pastry in a plastic bag and put in the refrigerator for 30 mins or more. 
At this point I have divided the pastry into two as my board is only big enough to roll out this much at one time.  Press the pastry into an approximate rectangle, again, without working too much.  The rectangle should be about the width that I will need to making my sausage rolls.   

Roll in one direction only until you have a long thin rectangle.  Fold like a letter into three and then rotate 90 degrees and then repeat the roll and fold process.


Put the pastry back into the refrigerator covered in plastic.  After about 30 minutes it will be ready to use.

The sausage meat 


For the filling I have chosen a piece of neck, but any part of the pig that has done a bit of work, leg, shoulder, etc. will make a very tasty filling. This is cut into cubes small enough to go through the mincer.  I have also included some extra back fat that I had in the freezer as I like my filling to be not too lean.


I have also added about 200 g of my home made air dried belly.  You could use a good quality cured bacon.  

I am lightly spicing my pork with black pepper, star anise and cinnamon.  This going to give and amazing smell and depth to the filling. 


I have also added two onions finely chopped, an unreasonably large quantity of garlic and about 100 g of bread crumbs.  The breadcrumbs are going to hold onto some of the fat that melts during cooking improving the moistness and flavour of the sausage roll.


The pastry is removed from the fridge and rolled out until about 5 mm thick.  If you don't have a board 1.3 m long you may have to do this in a few shorter pieces.  The meat is then pressed into a sausage shape on the rolled out pastry.


The pastry is sealed by brushing the seam with egg wash, I use equal parts egg and milk, and then I  pressed the folded over pastry together with the blunt edge of a pastry scraper. 


After cutting into the desired portion sizes, (the two large ones are for dinner tonight) they are baked at 180°C until a nice colour.


These are best eaten while still hot, but they also freeze and re-heat in the oven really well.  I'm not sure they are going to make it all the way to the birthday party.


Wednesday, 22 January 2014

Building a wood fired bread and pizza oven - finishing the brickwork

Now most of the brickwork is finished for the wood fired bread oven.  The main dome has been closed off by completing the end wall and the reducer arch has been finished and the large gaps between bricks backfilled.  The form-work has yet to come off the reducer arch, the oven will be covered in insulation for a couple of days with an electric heater inside to dry out the mortar first.  I have not had time to take as many pictures as I would have liked of the process I followed, but here are a couple of the end results.

reducer arch still supported
The back edge of the reducer arch has been shaped to allow better flow of exhaust gasses leaving the oven.  I will get a picture of this once the supports have come out.  The electric heater can be seen inside the oven.  It is around -6° C but with the oven well covered with extruded polystyrene sheets and the heater on, the internal temperature of the oven is about 35°C and the outside of the brickwork is feels warm when touched.

Rear wall of oven completed
After a couple of days of heating I expect the mortar to be fully dried out and then the temperature of the oven can be increased by lighting very small fires inside.  Before that can be done a small amount of cast refractory needs to be laid over the reducer arch to increase the thickness of the oven wall at the junction of the main arch and reducer arch.

Tuesday, 21 January 2014

Building a wood fired bread oven - Completing the main dome

This evening the main dome of our wood fired bread oven was completed.  We have been racing against the cold weather that has been forecast and unfortunately it has come a day early.  It looks like we could have temperatures below -5°C for the next month or longer.  In these temperatures the water content of the mortar will freeze which would not be good for the brickwork. In order to be able to continue in these temperatures, the dome needs to be finished and am electric heater sealed inside, this will keep the brickwork above freezing, and hopefully warm enough for the mortar to harden. 

I have been working flat out in the evenings in attempt to finish the main dome.

Main dome completed
You can see here the completed main dome.  The larger gaps in brickwork have been filled with a mix based on the the refractory mortar with a courser aggregate added.  This makes it more suitable for filling larger gaps and will help it dry out.  

I would have liked to leave the form-work for a couple of days, but a heater is needed under the arch, so the supports had to come out.  Fortunately the form-work came out without bringing all the brickwork down leaving the first glimpse of what the inside of the oven will look like.

Inside the oven arch
A little more brickwork still needs finishing before the oven can be wrapped up in insulation, so I am still working flat out.  I will update with further progress once I can take some more pictures.


Building a wood fired oven - dome bricks started

The first few dome bricks for our wood fired bread and pizza oven have now been set.  It is more usual for this to be done using a form for a single brick width so that.  The single brick width dome technique as described by Alan Scott in the book the Bread Builders, which I discussed in a blog post here, involves moving the form work after each brick arch has been set.  I have decided to make a full length form-work so that each course of dome bricks can be offset by half a brick for improved strength and resistance to cracking, it also allows me to build the entire dome before removing the support without worrying about it collapsing.  As I am racing the cold weather that is coming in a couple of days, and due to the lot temperatures here, the mortar is going off very slowly, so I need the dome finished fast and supported until it is fully finished.  

Form-work positioned in the oven
The form-work is adjusted to the correct height using four stacks of bricks and two quick substantial pieces of wood, cut the the correct length of the form.  The form has been trimmed to be just small enough to be removed through the oven mouth.


Angled dome support bricks
The bricks at the top of the side wall have been angled to maximise contact with the first dome brick.

First 4 rows of dome bricks
When laying the first 4 rows of dome bricks, some of the bricks did not want to stay in the correct position, so small pieces of fire brick have been wedged in the tapered gap between dome bricks.  Only a small amount of refractory mortar has been used here,  where the tapered gap become wider than about 6 mm, it has been left unfilled.  This will later be backfilled with a different mix of mortar.

Dome bricks supported by form-work
Care has to be taken in order to make the corners of dome bricks meet as closely as possible.  The bricks should fit together with almost no mortar separating them.  This is not possible in reality  due to slight inconsistencies in brick shapes and sizes.  
The weather here is looking like getting very cold in a couple of days time, so I need to get this dome finished, the supports removed and a heater under the dome before I get problems of the mortar freezing and destroying all our hard work.